Go to ‘Listings’ on the side menu and click on ‘New listing’. This opens a listing description box. Fill out at least the mandatory fields marked with an asterisk to continue, but the more information you add the better as all the information will be included on the listing.
.png)
Unit details
Rental objects - choose an existing unit you have added to the platform. Note that you can choose multiple units to be included in the listing. This is usually used when the building has a number of the same type of apartments. Then one listing can include all those apartments. Later you can choose as many applicants as many apartments you have.
Internal title - name that will be used internally when the listing is displayed
Title - here you can enter the title of the listing in different languages. The listing can be translated into 9 languages (Estonian, English, German, Polish, Finnish, Russian, Romanian, Latvian and Lithuanian). Currently, the Bidrento platform cannot translate open field texts, which means you need to enter the listing's title in different languages you wish the listing to be available in yourself.
Slug - this is used in the public listing URL. Enter the slug you would like the listing’s URL will include (e.g. street name + house number +apartment number)
Gallery - here you can upload pictures of the listing. Note that the first picture will be used as the listing's cover photo. You can drag pictures in the ‘Gallery’ box to change their order.
Also note that ‘Title’ under ‘Unit details’, ‘Lease details’ under ‘Leasing details’, and ‘Description’ under ‘Marketing details’ all have the option to add translations to them in 9 languages (Estonian, English, German, Polish, Finnish, Russian, Romanian, Latvian and Lithuanian). This means when you enter a translation for languages you choose or all of them, later when the applicant is seeing the listing’s ad they can switch between the offered languages and it changes accordingly.
After filling out all the applicable fields, the ‘Viewing availability management for listing’ page opens.
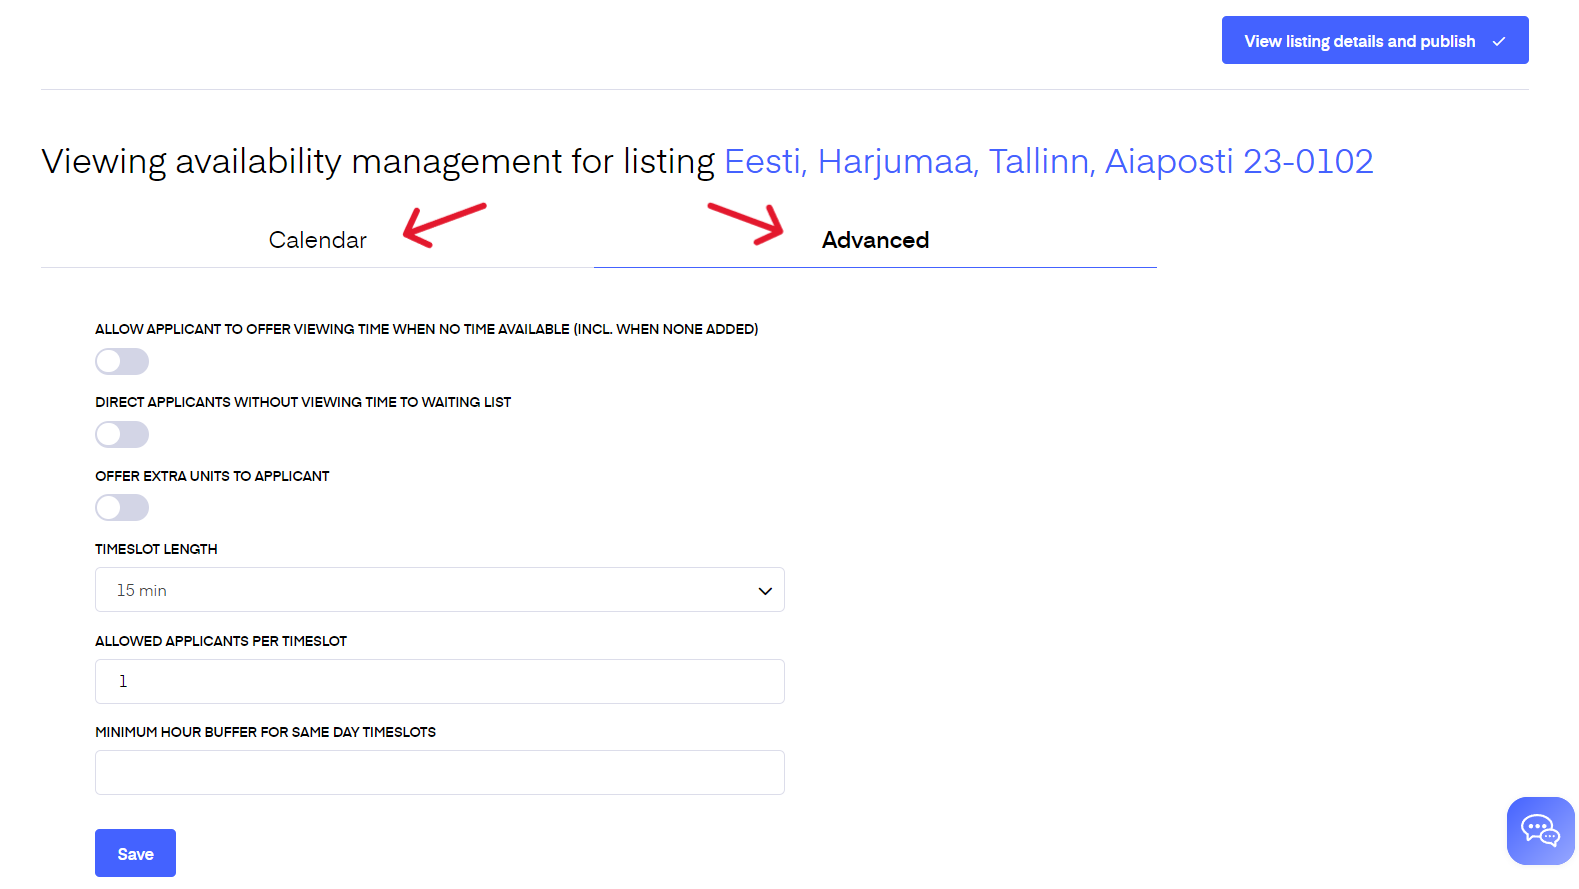
Viewing availability management for listing
Calendar
Here you can mark when you are available for showings, so the system can automatically display only suitable showing times for the applicants in the listing ad.
Advanced
Here you can edit the viewing booking view and options for the applicants.
Allow applicant to offer viewing time when no time available (incl. when none added) - when this is enabled an open text box in booking view is displayed when there are no available viewing times. The applicant can then enter there a suitable viewing time for them. This text will be shown with their application under ‘Applications’.
Direct applicants without viewing time to waiting list - when this is enabled, then applicants, who don’t choose a viewing time when applying (applicants can apply without choosing a viewing time, no restrictions) will be automatically added to the ‘Waitinglist’
Offer extra units to applicant - when this is enabled, the applicant is able to see other active listings on offer from you in the application form and choose them to be added to their application
Timeslot length - choose the length of the showing’s timeslot
Allowed applicants per timeslot - choose the number of different applicants that can attend one showing (it does not mean the number of people that can attend a showing)
Minimum hour buffer for same day timeslots - enter the minimum number of hours you would like to have between different showing timeslots