First 4 steps
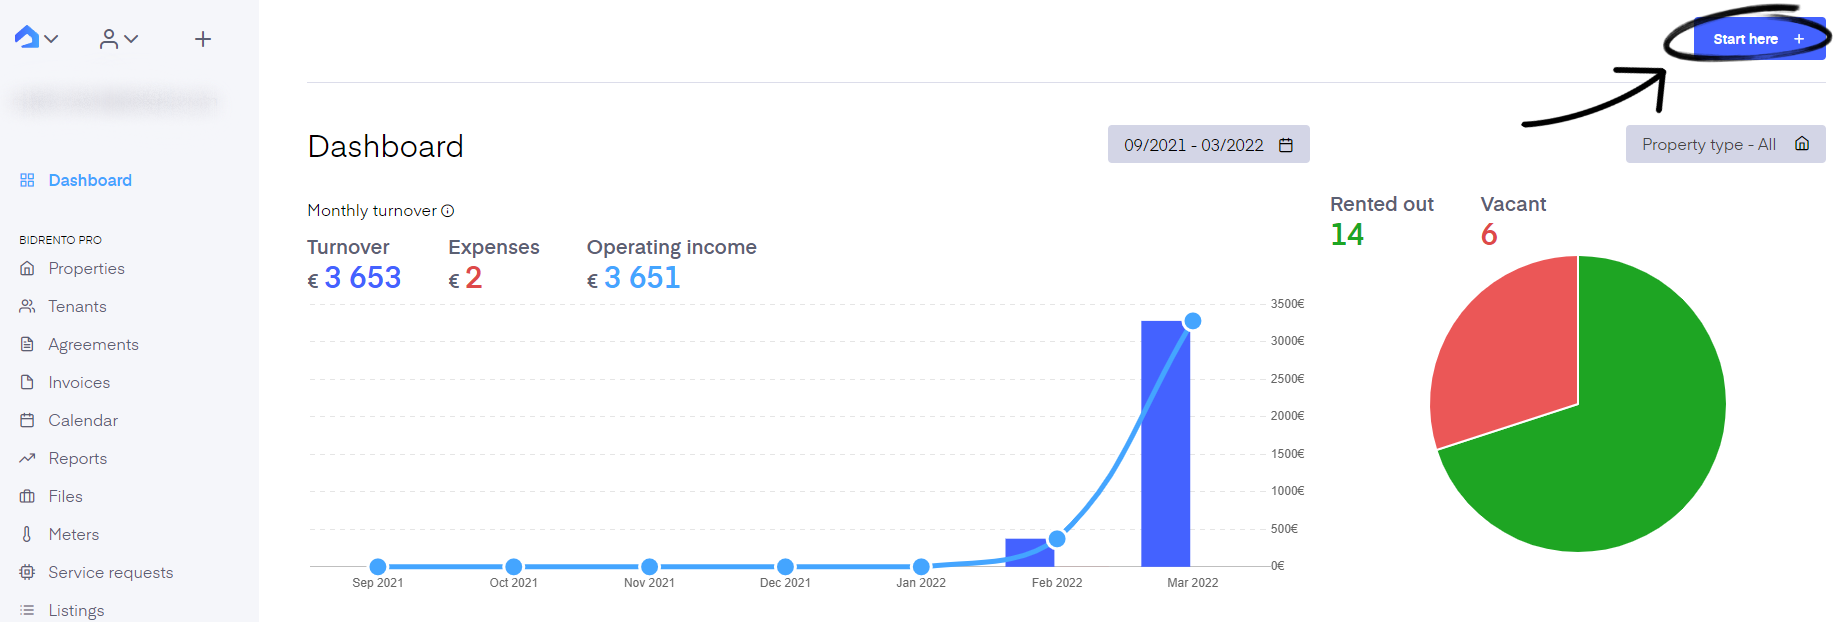
Find the ‘Start here’ button in the right corner of the ‘Dashboard’ page. This takes you to a Quick start menu which guides you through the first 4 steps of setting up your profile on Bidrento.
Step 1 is adding a rental unit or managing existing ones.
Just click on ‘new’ to add a new unit (instructions here) or choose an existing unit from the dropdown menu if you’ve already imported your units to the platform (import instructions here).
Step 2 is adding a new tenant or managing existing ones.
Just click on ‘new’ to add a new tenant (instructions here) or choose an existing tenant from the dropdown menu if you’ve already imported your tenants to the platform (import instructions here).
Step 3 is adding the invoice sender.
Follow the instructions on the screen.
Step 4 is adding a rental agreement.
Fill out all the required information (instructions here) and click either ‘Save as draft’ if you want to keep it as a draft first or ‘Save and confirm’ to save it and create an agreement. This opens the rental agreement’s information page.
Issuing your first invoice
After checking if all the information is correct click on the ‘Create first invoice’ button on the top right corner of the page.
.png)
Clicking on the button offers you two options:
- create one invoice combining rent and deposit costs (‘Create rent + deposit invoice’)
- create two separate invoices for either cost (‘Create deposit and rent invoices’).
Creating one invoice combining rent and deposit costs
Choosing to create one invoice with rent and deposit costs combined opens the ‘First invoice’ page for you. Check if all the information presented is correct, everything can be edited when needed. Also, note that your invoicing period doesn’t need to start on the first of the month, it can start whenever you prefer and you can issue the first invoice at any point of the month with Bidrento calculating the correct rental amount every time.
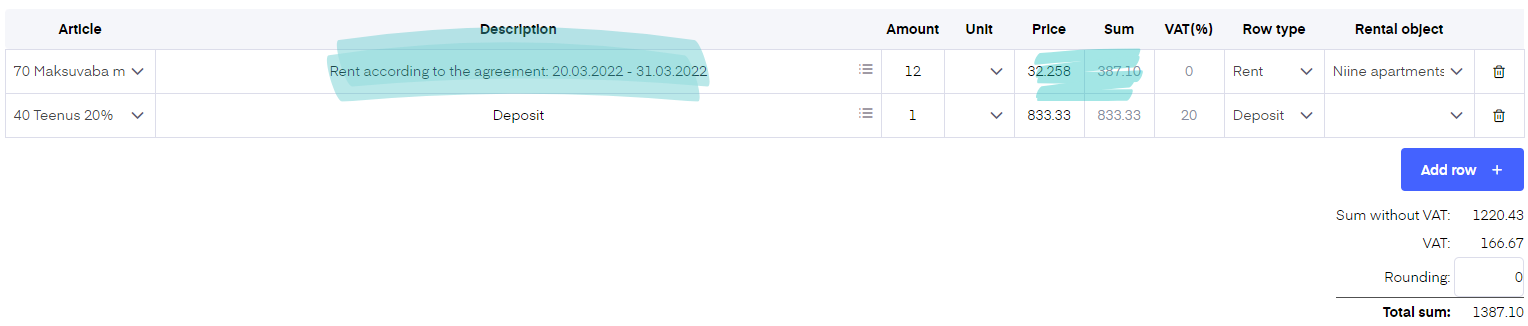
Example: Here the invoicing period starts on the 1st of the month. The first invoice is created on the 20th of the month, so the rent cost is calculated for 12 days.
.png)
The deposit amount is also listed and the full sum is presented on the invoice.
If all the information is correct, you can save the invoice and either send it to the tenant (‘Save and send invoice to tenant’ button) or continue with creating the second rent invoice (‘Save and add invoice for next rental period’ button’).
‘Save and add invoice for next rental period’
We know, that not all contracts start at the beginning of your invoicing period. That’s where Bidrento comes to your help by calculating for you the correct sum every time on the first invoice.
With ‘Save and add invoice for next rental period’ you can create the second rent invoice for the next full period right after the first one and send them together with the deposit invoice to the tenant. This can help you save time issuing invoices.
Creating two separate invoices for rent and deposit
Click on ‘Create deposit and rent invoices’ to first create the deposit invoice. Check if all the information is correct. When ready you can save the invoice and either send it to the tenant (‘Save and send invoice to tenant’) or continue creating the rent invoice (‘Save and create first rent invoice’).
‘Save and create first rent invoice’ opens ‘First invoice’ page. Here check if all the rent invoice information is correct. Note that your invoicing period doesn’t need to start on the first of the month, it can start whenever you prefer and you can issue the first invoice at any point of the month with Bidrento calculating the correct rental amount every time.
Example: Here the invoicing period starts on the 1st of the month. The first invoice is created on the 20th of the month, so the rent cost is calculated for 12 days.
.png)
If all the information is correct, you can save the invoices and either send them to the tenant (‘Skip and send invoice to tenant’ button) or continue with creating the second rent invoice (‘Save and add invoice for next rental period’ button’).
Sending the invoice(s) to the tenant
When you’re ready to send the invoice(s) ‘Send email to tenant’ page opens. Here you can adjust the subject line, add any additional documents if needed and adjust the content of the email (you can modify all the email templates here).
Once everything’s checked, just press ‘Send’. You can see all your sent and unsent sales invoices under ‘Invoices’ - ‘Sales invoices’ - ‘Sent invoices’.
Congratulations- you’ve issued your first invoices!