Tip! If you have multiple units in one building, then add the building before adding the separate units to save time by having most of the unit’s information prefilled for you from the building's information.
To add new single units to your account click on the ‘New unit’ button.
This opens the unit description page. Fill out at least the mandatory fields marked with an asterisk to continue, but the more information you add the better. 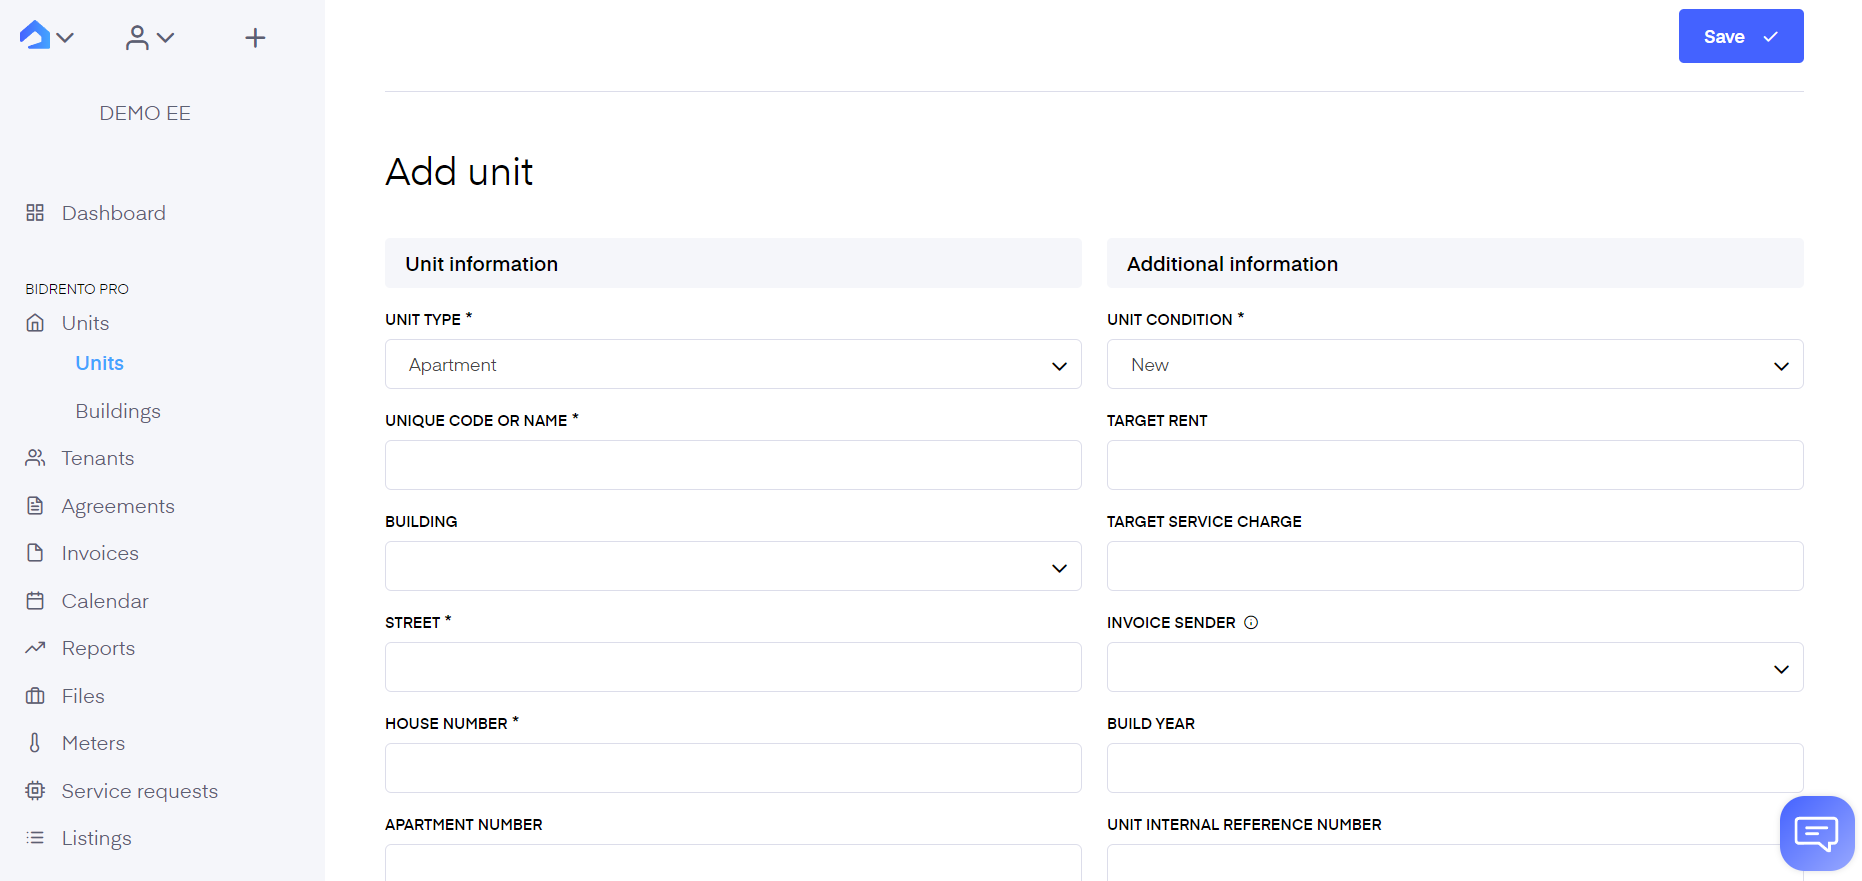
Find descriptions of the fields below-
Unit information
Unit type - first select from the dropdown menu what type of unit you would like to add (e.g an apartment, commercial, storage space, etc.). Object types can be added/changed under ‘Object settings’
Unique code or name - this code or name will be used on the platform to reference your unit. Choose a code or name that will help you easily recognize the unit.
Building - either select an existing building (check Buildings section) or create a new building the unit belongs to
Street - the street name the unit is located in
House number - the house number of the unit
Staircase/entrance - here you can choose the specific staircase/entrance where the unit is located (the field only appears in the unit card, if you have set it up under the corresponding building card).
Apartment number - the unit’s apartment number
City - the city the unit is located in
Postal code - the postal code of the unit
County - if applicable, the county the unit is located in
Total area - total area of the unit in square meters
Total floors - number of floors in the building
Floor - which floor is the unit located at
Number of rooms - total number of rooms in the unit
Number of bedrooms - the total number of bedrooms in the unit.
Balcony area - total square meterage of balcony area if applicable
Terrace area - total square meterage of terrace area if applicable
Ceiling height - the height of ceilings in the unit in meters
Building material - select from the dropdown menu the type of material the unit is built of (stone, panel, log, etc.)
Ventilation system - select from the dropdown menu the type of ventilation the unit has (natural, exhaust, forced, etc.)
Boiler type - the type of boiler the unit has if applicable (electric, gas, etc.)
Isp Options - internet service provider options for the unit
Interior design style - add here the interior style of the unit (e.g. classic, modern, industrial, baroque, etc.)
Additional information
Unit condition - select from the menu the condition of the unit (new, renovated, etc.)
Target rent - the planned rent price for the unit (it’s just an informative field, so later on you can compare the target with the real rent price)
Target service charge - the planned service charge price for the unit (it’s just an informative field, so later on you can compare the target with the real rent price)
Gender preference - with this field you can define which gender of tenant you prefer in the unit. It's useful for student hostels where they quickly need to find rooms or bed places for men and women to avoid placing students of different gender in the same room. In addition, you can also add a new column in the Objects section that shows the gender preference for each unit + you can also add a filter to filter out the preferred ones.
Invoice sender - to prefill the field, go to ‘Settings’- ‘Invoice settings’- ‘Invoice sender’ and fill out the necessary fields, all communication to this unit later will be from this sender
Build year - the year the unit was built
Unit internal reference number - applicable if you have your own numbering system for units that you would like to keep on the platform
Registry number - the official unit's registry number from the Registers and Information Systems
Utilities in summer - enter the average utilities in the summer for the unit, this helps you answer your tenant’s questions when needed
Sample summer month - pick a month you would like to showcase for the utilities example
Utilities in winter - enter the average utilities in the winter for the unit, this helps you answer your tenant’s questions when needed
Sample winter month - pick a month you would like to showcase for the utilities example
Repair fund (per ㎡) - if applicable add the repair fund per the unit’s square meterage
Repair fund (total) - if applicable add the total repair fund for the unit
Parking - tick if your unit includes a parking spot. Additionally, if you have added parking spots as units you can add them from the dropdown menu
Pets allowed - tick if pets are allowed on your unit, checking this opens an open field where you can list what kind of pets are allowed
Allow registration of residence - tick if it is allowed to register their residence for this address
Rent by room - tick if this unit can be rented by the room
Automatic fire alarm system - tick if your unit includes an automatic fire alarm system
Automatic surveillance system - tick if your unit includes an automatic surveillance system
Kitchen type - choose from the dropdown menu the kitchen type includes if applicable
Views - here you can list what views the apartment has (North, South, West, etc.), this is important if you also plan to create a public listing for the unit, this info will be automatically included. Under "Other" you can enter your own specific description of the view
Notes - add any additional information you think is important, this is important if you also plan to create a listing post for the unit, this info will be automatically included
Viewing instructions - add any additional information on viewing appointments, this is important if you also plan to create a listing for the unit, this info will be automatically included
The date the listing ad was posted - add the date the unit’s listing was published, this helps you keep track of how long the listing’s ad has been up for
Meters
Enable if your tenant needs to enter meter readings manually for your unit. Tenants can post meter readings only if the meters have been added to the system (link) and they’ve been invited to the tenant app (link).
Owner information
Owner type - pick from the drop-down menu if the owner of the unit is a legal entity or a private person
Owner name - add the unit owner’s full name
Owner registration number - add the official unit owner registration number, if the owner is a company
Housing association details
Name of the association - if applicable add the name of the unit’s co-operative
Loan balance - if applicable add the unit’s loan balance
Loan balance date - if applicable add the date the balance was checked
Loan due date - if applicable add the due date of the loan
Purchase and market information
Seller name - the name of the person the unit was bought from
Seller contact - previous owner’s contact info
Contact phone - previous owner’s phone number
Contact email - previous owner’s email
Purchase price - the price of the unit when bought, this is important if you wish to check your unit’s ROI under ‘Reports’
Purchase date - date of the purchase of the unit
Handover date - date the unit was handed over from the previous owner to the current one
Market price - current market price of the unit
Market price date - the date when the current market price was checked
Renovation details
Renovation year - if applicable the year the unit was last renovated
Roof renovation year - if applicable the year the roof of the unit was last renovated
Plumbing renovation year - if applicable the year the plumbing of the unit was last renovated
Facade renovation year - if applicable the year the facade of the unit was last renovated
Stairway renovation year - if applicable the year the stairway of the unit was last renovated